Have you ever walked through the grocery store, admiring everyday items, and thought to yourself “Wow, I could make a bong out of that”? No? Well, now you will. There are so many ways to get high in a pinch, and we’ve compiled a how-to guide for our favorite homemade pipes. Get ready to tap into your creative side.
DIY Pipe Ideas
Stoners are some of the most creative folks you’ll ever meet. Probably because weed is known to interact with the brain’s frontal lobe, inspiring divergent thinking and opening up the portal to our deepest creative well. Not to mention, a smoker without a pipe or papers is bound and determined to find a way to get high.
There are plenty of everyday items that you probably have in your house right now that are just begging to become your newest smoking companion. Take a look at our how-to make homemade pipes with these common items.
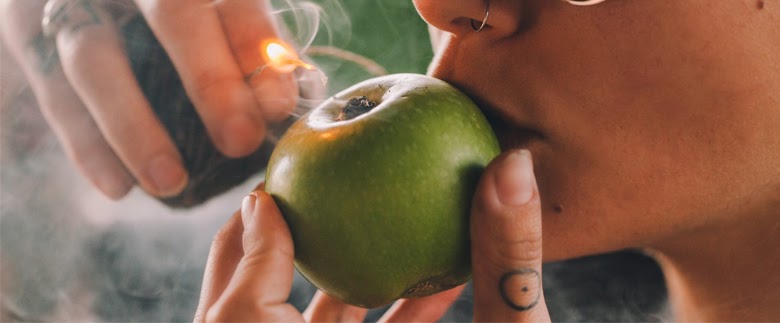
Apple Pipe
One of the most common and effective methods for making homemade pipes is to make yourself an apple pipe. So how do you make an apple pipe?
You’ll need:
A medium to large apple
Screwdriver or chopstick
Step-by-step apple pipe guide
Remove the stem from the top of the apple. This divot will be the bowl.
Use the screwdriver or chopstick to poke a hole from the divot diagonally through the sidewall of the apple. Blow through the hole to clear any loose chunks.
Next, pierce another hole about an inch below the top bowl that meets up with the existing tube. Do not push it all the way through. You want to create a chamber system.
You’re ready to load a bowl of freshly ground herb into your new apple pipe and enjoy the added benefits of apple terps!
Banana Pipe Pipe
If apples aren’t your thing, perhaps a banana pipe is more up your alley. This bright yellow fruit is more than just a potassium-rich snack, it’s an ergonomically designed bowl waiting to happen.
You’ll Need:
Hard, fresh banana (no soft spots or browning, opt for one on the greener side if possible)
Knife
Small teaspoon
Chopstick or metal straw
Tinfoil
Needle
Step-by-step banana pipe guide
Cut off about one inch of the bottom end of the banana and set it aside. We’ll be using it later.
Cut off the top of the banana (where the stem is) and toss it, we won’t be using it.
Use the chopstick or metal straw to pierce a hole into the top of the banana down through the middle. Stop about three-quarters of the way down.
Then, take the chopstick or straw and puncture a hole perpendicular to where the end of the first hole you just made. Be careful to punch through the peel without causing too much damage.
Take the end you set aside earlier and clear out the flesh of the banana with a small teaspoon. Puncture a hole through the end. This is now your bowl.
Set the bowl into the hole you created in the peel. This should be a snug fit.
Blow through all holes to ensure there is ideal airflow and no loose banana bits.
Line your bowl with a small piece of tin foil and punch a few small holes with a needle.
You are now ready to pack a banana bowl. Bonus points if you have a tropical strain on deck. There are plenty of phallic-shaped produce items that make excellent homemade pipes. Try a cucumber pipe or carrot pipe next time you’re feeling creative.
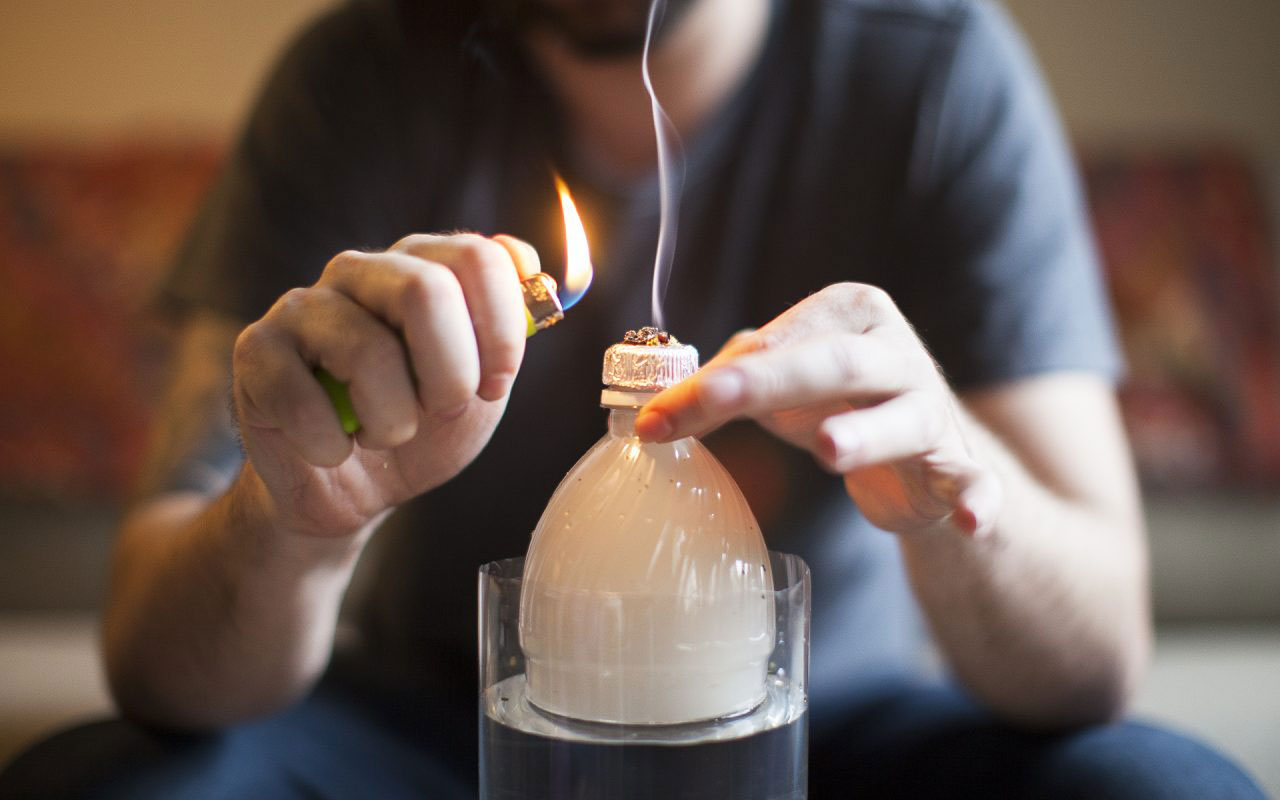
Water Bottle Bong
We love creative ways to put single-use plastic back to work. Consider making a water bottle bong a superior effort at saving the environment. We commend you on this stoner adventure.
You’ll need:
A plastic bottle of any kind, rinsed, with labels removed (preferably around 17 ounces)
Aluminum foil
Needle or toothpick
Ballpoint pen
Lighter
Water
Step-by-step water bong guide
Take apart the ballpoint pen until just the shaft remains. This is the only part you’ll need.
Use your lighter to burn a small hole into the side of the water bottle, about halfway down.
While the plastic is still gooey, put the pen into the hole. It will sit somewhat diagonally, with about a 1-2 inch space between the bottom of the pen and inside the bottom of the water bottle.
Use the tin foil to make a bowl that will fit into the top of the downstem you just made with the pen. Double or triple up in layers, and fashion the bowl so it inserts into the pen enough to hold at least a few hits of weed. Fold the excess tin foil over the sides and use the needle to poke a few holes into the center of the bowl.
Rotate the bottle about a quarter, and use the needle or toothpick to whittle a hole on the side of the bottom for a carb.
Add enough water to cover the bottom of the pen.
You’ve done it. You are the proud new owner of a water bottle bong – the epitome of homemade pipes. Nothing can stop you now. Once you’re ready for the next challenge, read on to learn about how to make a corn pipe.
Corn Cob Pipe
You might think this is an old-timey way to smoke weed, but it’s actually more like a great way to reduce, reuse, and recycle an otherwise fairly useless food scrap. To make a corn cob pipe, start with the fattest ear of corn you can find. Cook the corn and eat those kernels. We recommended salted butter, but anyway you like, it is just fine.
You’ll need:
Ear of corn
Sandpaper (60 grit)
Pocket knife
Drill
Drill bits (5/16 and 5/32 inch)
Plastic or wood pipe stem
Step-by-step corn cob pipe guide
When you’re finished, snap the ear in half. The widest end of the base is the part you’ll use for the corn pipe.
Line a baking sheet with tin foil and preheat your oven to 200 degrees Fahrenheit.
Bake the corn cob for seven hours, rotating every hour.
If the middle of the cob still feels slightly damp or malleable, bake in 20 minutes increments until it is fully dried.
Once the cob cools out of the oven, use a piece of sandpaper to grind down all sides of the corn cob until it is smooth.
Using the knife, prep a small hole on one blunt end of the cob.
Use a drill and the 5/16 bit to drill a hole into the pilot you carved with your knife. Go slow and drill about halfway through the cob.
Switch drill bits and use the 5/32 bit to drill even deeper into the first hole you just made. Go three-quarters of the way through the cob. This hole allows airflow but prevents the weed from blocking the hole.
Then, use the 5/32 bit to drill into the side of the corn cob, aiming to join the perpendicular hole you made at the end of the cob.
Add your stem into the side hole you just created and ensure it’s secure.
Now you can load the bowl and puff away on this classy pipe just like your grandpappy might have done.
Pen Pipe
If you look around your house, I bet you’ll find a ton of pens that don’t work, are never used, or have black tips from packing down bowls. No? Okay, just us then. Well, if you happen to have an old pen handy (we love gel pens) try your hand at making a homemade pen pipe.
You’ll Need:
Pen with a metal tip and removable cartridge. Bonus if the pen tube is metal, too.
Knife or other sharp, pointed object
Step-by-step pen pipe guide
Completely disassemble the pen. You might need a sharp object to get the bottom cap off if it’s glued shut.
Take the metal tip and flip it around to insert the pointed tip into the end you just unscrewed it from. This is now your bowl.
Okay, that was it. Seriously. Pack the bowl and inhale through the other open end. We want to note that this is not a long-lasting device, and should only be used once or twice before throwing away. For a smoother smoking experience, use a cigarette filter at the mouthpiece.
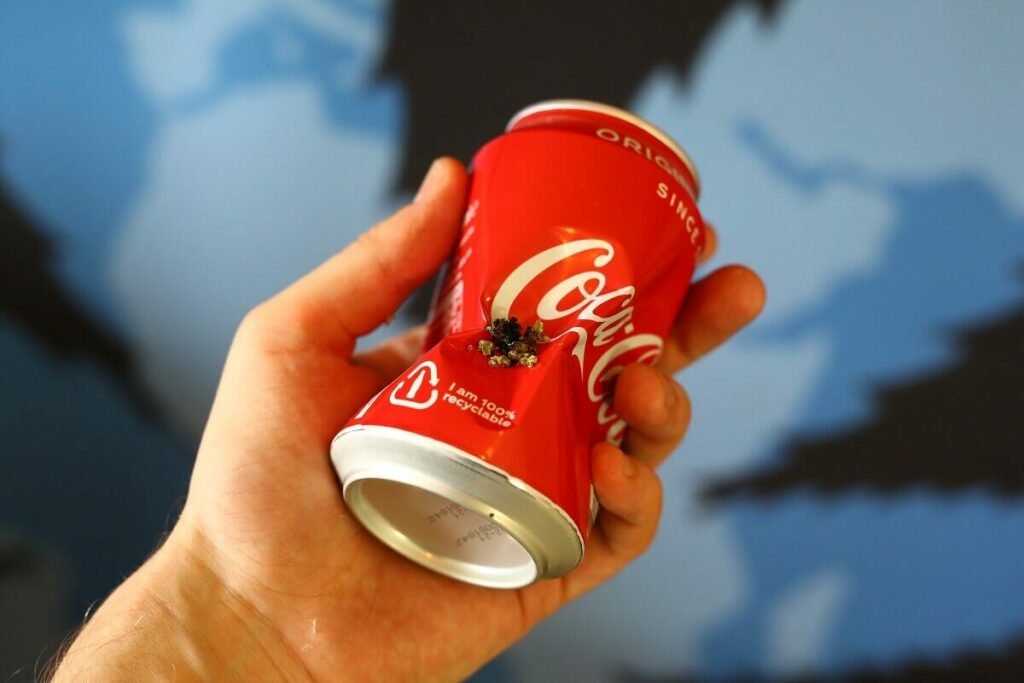
Soda Can Pipe
Wow, talk about an old-school last resort. We aren’t condoning this practice, because it does pose some possible health risks. If you’re hell-bent on smoking out of a soda can pipe, here’s how you do it.
You’ll Need:
Soda or beer can (or any pull-tab aluminum can)
Needle
Screwdriver
Step-by-step soda can pipe guide
Lay the empty can on its side and press into the middle to create an indent. This is where you’ll place your weed, so try to make it as bowl-shaped as possible.
Use the needle to punch several holes into the indent you’ve just made.
A few inches over on the side, use the screwdriver to puncture a carb hole into the side of the can.
And now you can load the bowl and smoke it. The mouthpiece is where you’d normally take a drink out of the can. Avoid smoking out of a can if possible, the lining and wrap on these cans are not-so-great to inhale.
Conclusion
Okay, this has been a fun adventure in stoner ingenuity. If you managed to create any of the homemade pipes in this guide, you’re an all-star weed aficionado. If you can, stick to fruits and veggies for a healthier high, and opt out of pop cans and plastic when possible. Otherwise, kick back and enjoy those homemade pipes.
Since its launch in May 2020, California-based beverage company Uncle Arnie’s has shot to the top of the list of best-selling weed drinks. With over one million units sold since then, Uncle Arnie’s produces four out of the top five best-selling cannabis infused beverages in California. In addition to its success in California, Uncle Arnie’s
Join us at Hall of Flowers 2024 in Santa Rosa on Sept 20-21. Enjoy exclusive products, celebrity chefs, and the event’s first-ever public festival day.
Discover Mr. Moxey’s Mints, pioneers in cannabis edibles since 2015. Offering a range of mints tailored for sleep, relief, energy, relaxation, balance, and zen.
In the huge, concrete cities of New York and New Jersey, something very special is happening. Laws have changed, and people are allowed to get certain types of plants delivered right to their homes! These aren’t just any ordinary plants, though. We’re talking about a rare and wonderful plant that helps people feel calm, relaxed,